Flashing with zflasher AVR
zflasher AVR is an app for Android devices which can update lights using a USBASP programmer or a CH340 UPDI programmer. It is based on avrdude 7.3 but packaged with a GUI which makes it simple to use. Support for UPDI is in app versions based on avrdude 7.0 and later, so be certain that the app is fully up-to-date.
Note
Depending on the type of USB port on the Android device, it may be necessary to use an adapter of some sort when connecting to the programmer. For example, a USB C (M) to USB A (F) adapter or an OTG cable.
Installing zflasher AVR
zflasher AVR can be installed from the Google Play store.
zflasher AVR GUI
After installing, launch the app by tapping its icon. The app will load and present its GUI:
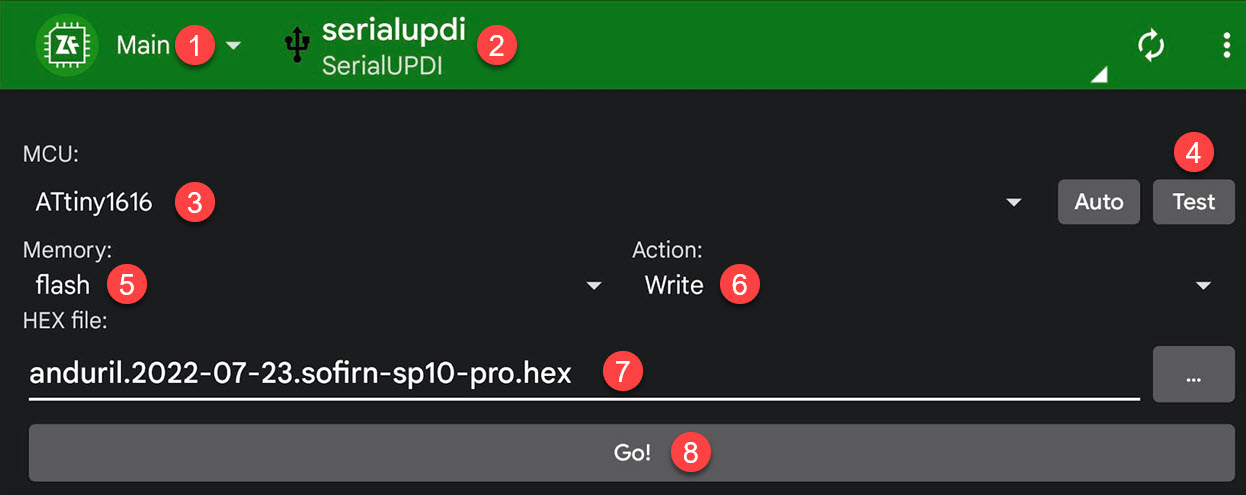
zflasher AVR App GUI
See also
The various parts of the GUI roughly correspond to parameters and actions from avrdude. See that document for additional details about the process.
The labels on figure zflasher AVR App GUI are:
- 1 - View Selection
Changes the GUI between views for the main flashing functions, fuses, and the log. Only the Main view is relevant here.
- 2 - Programmer ID
The type of programmer being used, such as
usbasporserialupdi.- 3 - MCU / Chip Part Type
The part number of controller chip on the light, for example: ATtiny85, ATtiny1634, or ATtiny1616. In most cases the MCU for a given light is listed in the Anduril MODELS file.
- 4 - Test Button
Button to perform a test operation to see if the programmer can communicate with the controller chip. This test is performed immediately and does not require configuring any of the later options.
- 5 - Memory
The type of memory to operate on. Only two areas are relevant for most controller chips found on flashlights,
flashandeeprom(Controller Chip Storage Areas).- 6 - Action
- Read
Read the chosen area from the chip and write it to a local file. This is used when making a backup of the current firmware on a controller chip.
- Write
Write the chosen area on the chip using content from a local file. This is used when updating the firmware on the controller chip to a new version using a local file.
- Verify
Read the chosen area from the chip and verify its contents.
- 7 - Filename
The file to read or write
- 8 - Go Button
Button to initiate the chosen action.
Note
The format of the options changes slightly depending on whether the Android device is in portrait or landscape mode. In particular, the view option is tabbed in portrait mode but a drop-down menu in landscape mode.
Ping the Device
The best first test of connectivity to the light is to perform a “ping” of sorts using the Test function of the app.
To test connectivity between zflasher and the light:
Ensure the app is on the Main view (1)
Select the appropriate programmer (2)
Select the MCU matching the controller chip on the light (3)
Connect the programmer to the Android device, and connect the probe to the controller board.
Click Test (4)
Backing Up
An important part of the process is making a backup of the firmware in case the new firmware does not work as expected. The old firmware can be written back so the light can be returned to its prior state.
When performing a read operation, zflasher reads the contents of the chosen area on the controller chip and then stores the contents in a file.
To create a backup by reading, do the following:
Ensure the app is on the Main view (1)
Select the appropriate programmer (2)
Select the MCU matching the controller chip on the light (3)
Select the Memory area to backup: flash or eeprom (5)
Set Action to Read (6)
Select or enter a filename to save (7)
The Downloads folder is a convenient place to store such files temporarily.
Connect the programmer to the Android device, and connect the probe to the controller board.
Click Go (8)
Updating
Now it’s time to write new firmware to the controller chip on the light. This is similar to the read operation above, but in the opposite direction.
When performing a write operation, zflasher reads the contents of a given local file, erases the chosen area of the controller chip, writes the contents of the local file to the chosen area of the controller chip, and then performs a verify operation to confirm the operation succeeded properly.
To update the controller chip with a write operation, do the following:
Ensure the app is on the Main view (1)
Select the appropriate programmer (2)
Select the MCU matching the controller chip on the light (3)
Select the Memory area to update: flash or eeprom (5)
Set Action to Write (6)
Select or enter a filename containing the new firmware or eeprom settings (7)
Connect the programmer to the Android device, and connect the probe to the controller board.
Click Go (8)