Updating a 2020 Sofirn SP36 Pro, Sofirn LT1, and other SOIC8 Lights
There are at least three versions of the SP36 Pro board around:
No flashing pads with ATtiny85 – Covered by this guide
Flashing pads with ATtiny85
Flashing pads with ATtiny1616
This document primarily focuses on the SP36 Pro but because it is updated by clipping to its chip with a SOIC8 Clip, the same guide can also apply to other lights where the Controller Chip is easily accessible, such as the Sofirn LT1 and Q8 Pro.
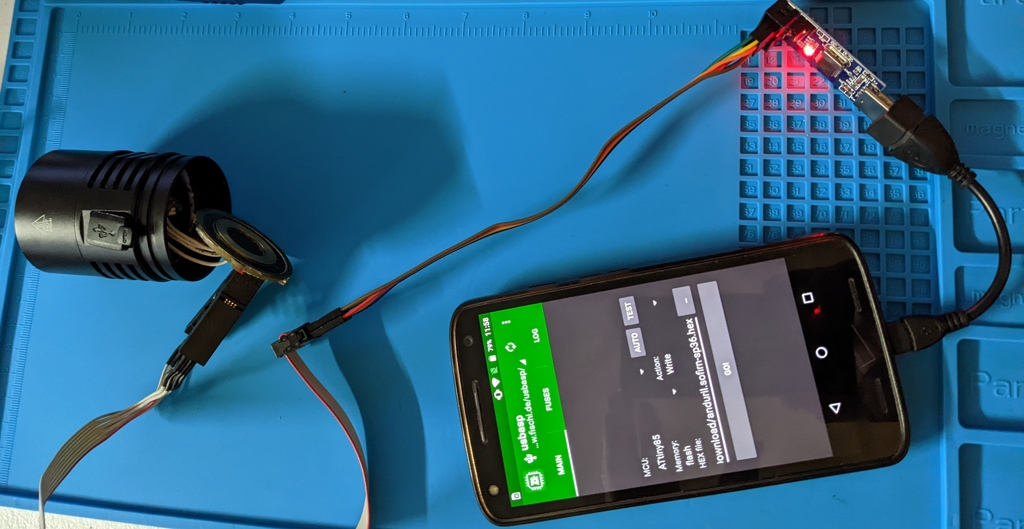
SP36 Pro with the driver board exposed, SOIC8 clip, programmer, and zflasher
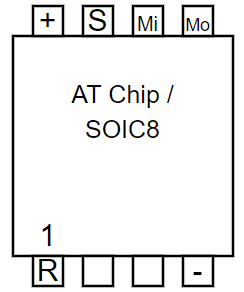
SOIC8 chip with pin 1 marked (usually has a divot on the chip)
Identify The Light And Current Firmware
There is not a lot of variation in these lights. Identifying the Correct Firmware is mostly a matter of matching the model from the Anduril MODELS file. If the light is old enough not to have flashing pads, odds are a Version Check will not include a model ID, but it is rare that these lights vary from their listing in the models file.
Access the Controller Chip
Unlike other cases where it’s a simple matter of unscrewing the head off the light and using pads, there is extra work involved here to reach the controller chip.
The ideal case is an LT1 or Q8 Pro where the driver board with the controller chip is Secured with Screws so it’s only a matter of removing a couple small screws and carefully flipping over the board.
The more complicated case is the SP36 Pro where the board is secured by glue
There is a disassembly guide for the SP36 Pro on BLF.
That post has pictures and directions, but to save a click, here is the general idea:
Unscrew the head from the battery tube
Use needle nose pliers to unscrew the ring retaining the switch
Remove the ring and rubber switch cover
Loosen the switch PCB. If it’s glued it may require a tool such as a dental pick to pry it free.
Carefully move the switch PCB out of the way but don’t pull too much on the wires.
Use an Allen wrench, S hook, bent nail, or similar to put downward pressure on the PCB through the switch hole
Look through the switch hole and find a bare spot on the board to press. Careful not to dislodge the the wiring and careful not to press the switch wires into the edge of the switch hole as it can damage them.
Carefully pry, the glue will eventually come free, but watch where the tool will apply pressure.
With the PCB loose, check to make sure nothing was damaged when removing the board.
I used a 5mm Allen wrench with duct tape covering the end going inside the light. The advantage of the Allen wrench is that lifting up on the handle uses the “elbow” of the wrench against the switch hole as a fulcrum rather than relying on pushing down or hammering. I used a T handle and some socket adapters to get extra leverage and it popped out after some work.
Programmer Hardware and Probe
Updating these lights requires a USBASP programmer and a SOIC8 Clip.
Setup the USBASP programmer as described in USBASP Drivers.
There are no official or pre-made kits for updating these lights, but with a USBASP, SOIC8 Clip, and some jumper wires, it’s not difficult to setup.
See SOIC8 Clip for details on wiring up the programmer and SOIC8 clip.
Obtain a New Firmware File
Download or compile the appropriate firmware as described in Obtaining a new Firmware File.
Setup Programming Software
Choose one of the Flashing Methods, setup the software, and use the software-specific guide for the following steps.
Note
For simplicity, this guide will use avrdude examples, but zflasher can also be used in a similar manner.
Test the Connection with the Light
Connect the SOIC8 clip to the programmer, the programmer to the computer or android device, and connect the SOIC8 Clip to the controller chip on the driver board.
See also
Refer to SOIC8 Clip for details on making the connection.
Use the test or ping function of the flashing software to confirm the connection is working.
PS> .\avrdude.exe -p t85 -c usbasp -n
Backup the Current Firmware
Connect to the light and read the current firmware from the light to a file to make a backup.
PS> .\avrdude.exe -p t85 -c usbasp -U flash:r:old-firmware.hex:i
Update the Light with New Firmware
Connect to the light and write new firmware from the file to the light.
PS> .\avrdude.exe -p t85 -c usbasp -U flash:w:sofirn-sp36.hex
Perform a Factory Reset
Perform a Factory Reset after reassembling the light.